We are going to go over some of the basics for HDR photography as it applies to drone pilots. Specifically for those of us working with real estate. I do not claim to be an expert in HDR photography, nor do I have time to learn to be. Real estate is high volume, low pay. Speed is king here. I'm going to show you some techniques we have learned that allow us to quickly use HDR to improve our photos.
Introduction
HDR is highly abused in real estate photography in general. It can often create extremely fake looking photos that border on a misrepresentation of the property. On the other hand, it can add a sense of depth and create extremely beautiful photos as well. Used properly it can be an extremely valuable technique to fix errors in photos and make your work standout.
What is HDR
HDR is basically taking multiple images at different shutter speeds and then merging them together. The merged photo then has a much larger range for exposure levels. It allows you to adjust the exposure in certain areas of a photo without affecting the rest of the image and still appearing like a natural(mostly) photo. Images taken in this fashion must be done so in an extremely rapid fashion or else things as simple as leaves rustling in the wind will cause problems.
When to use HDR
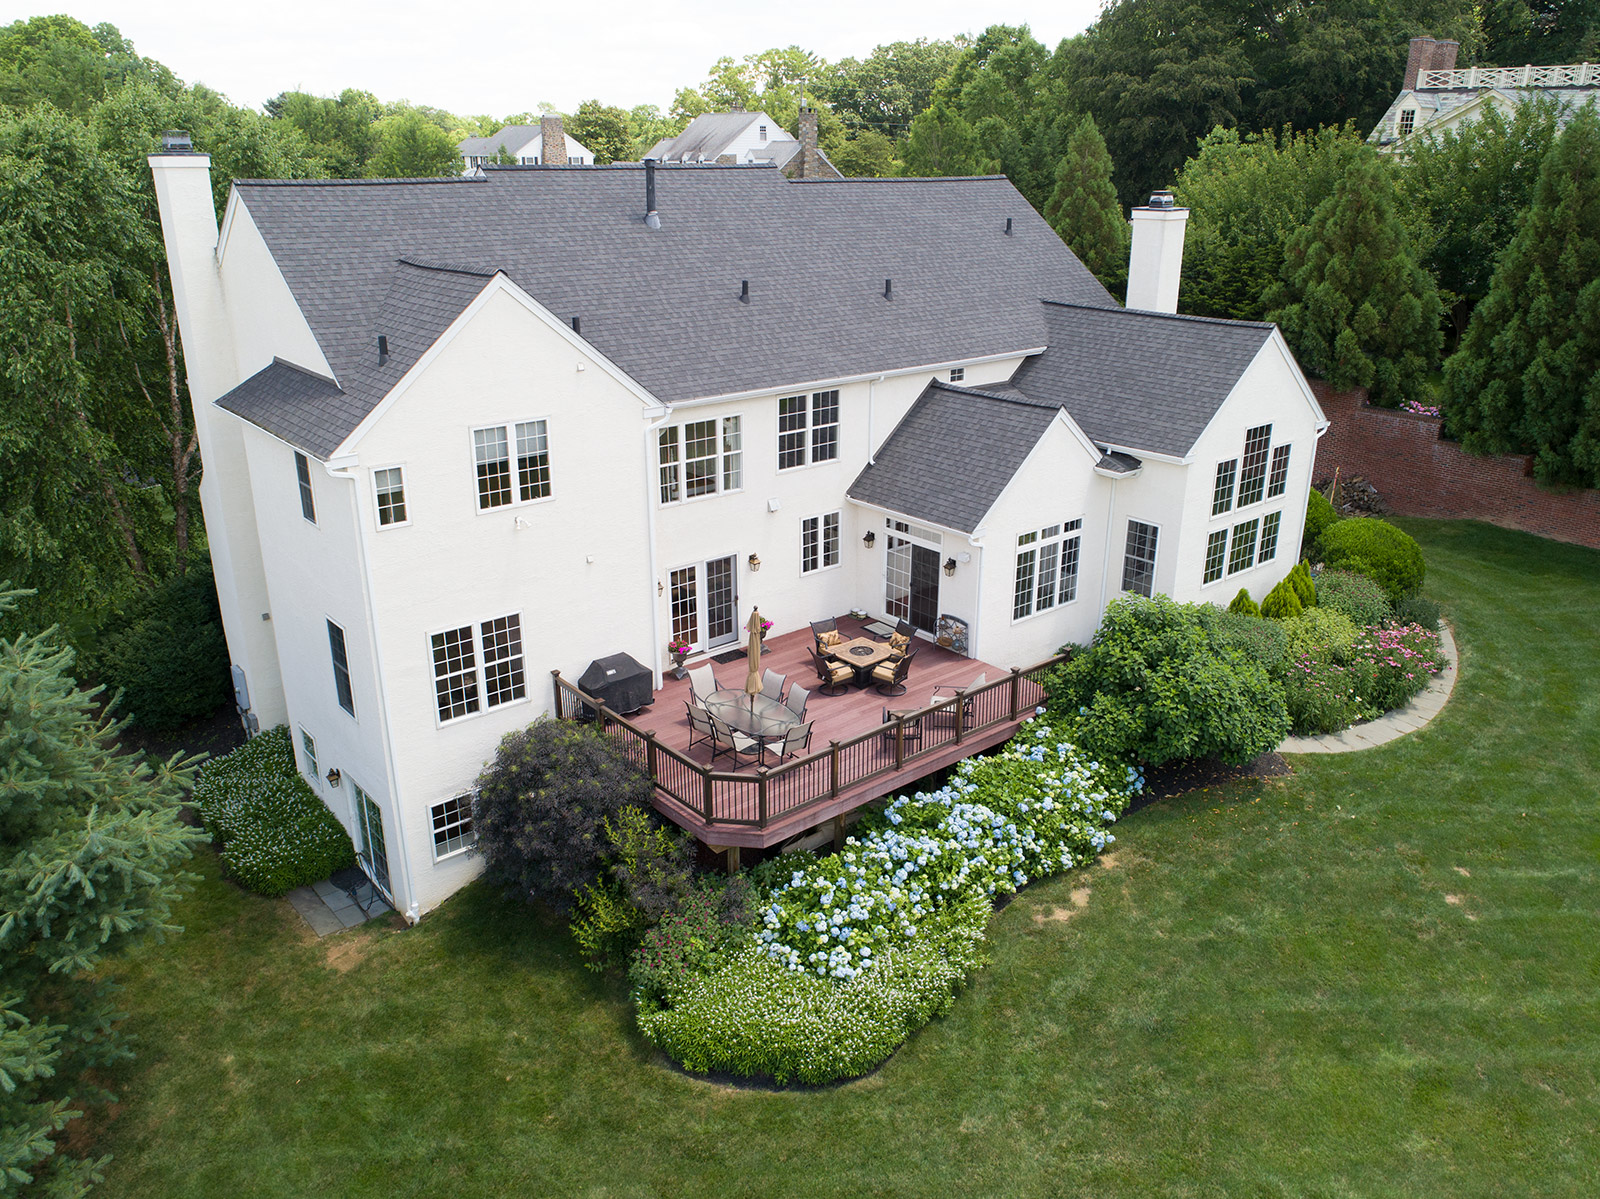
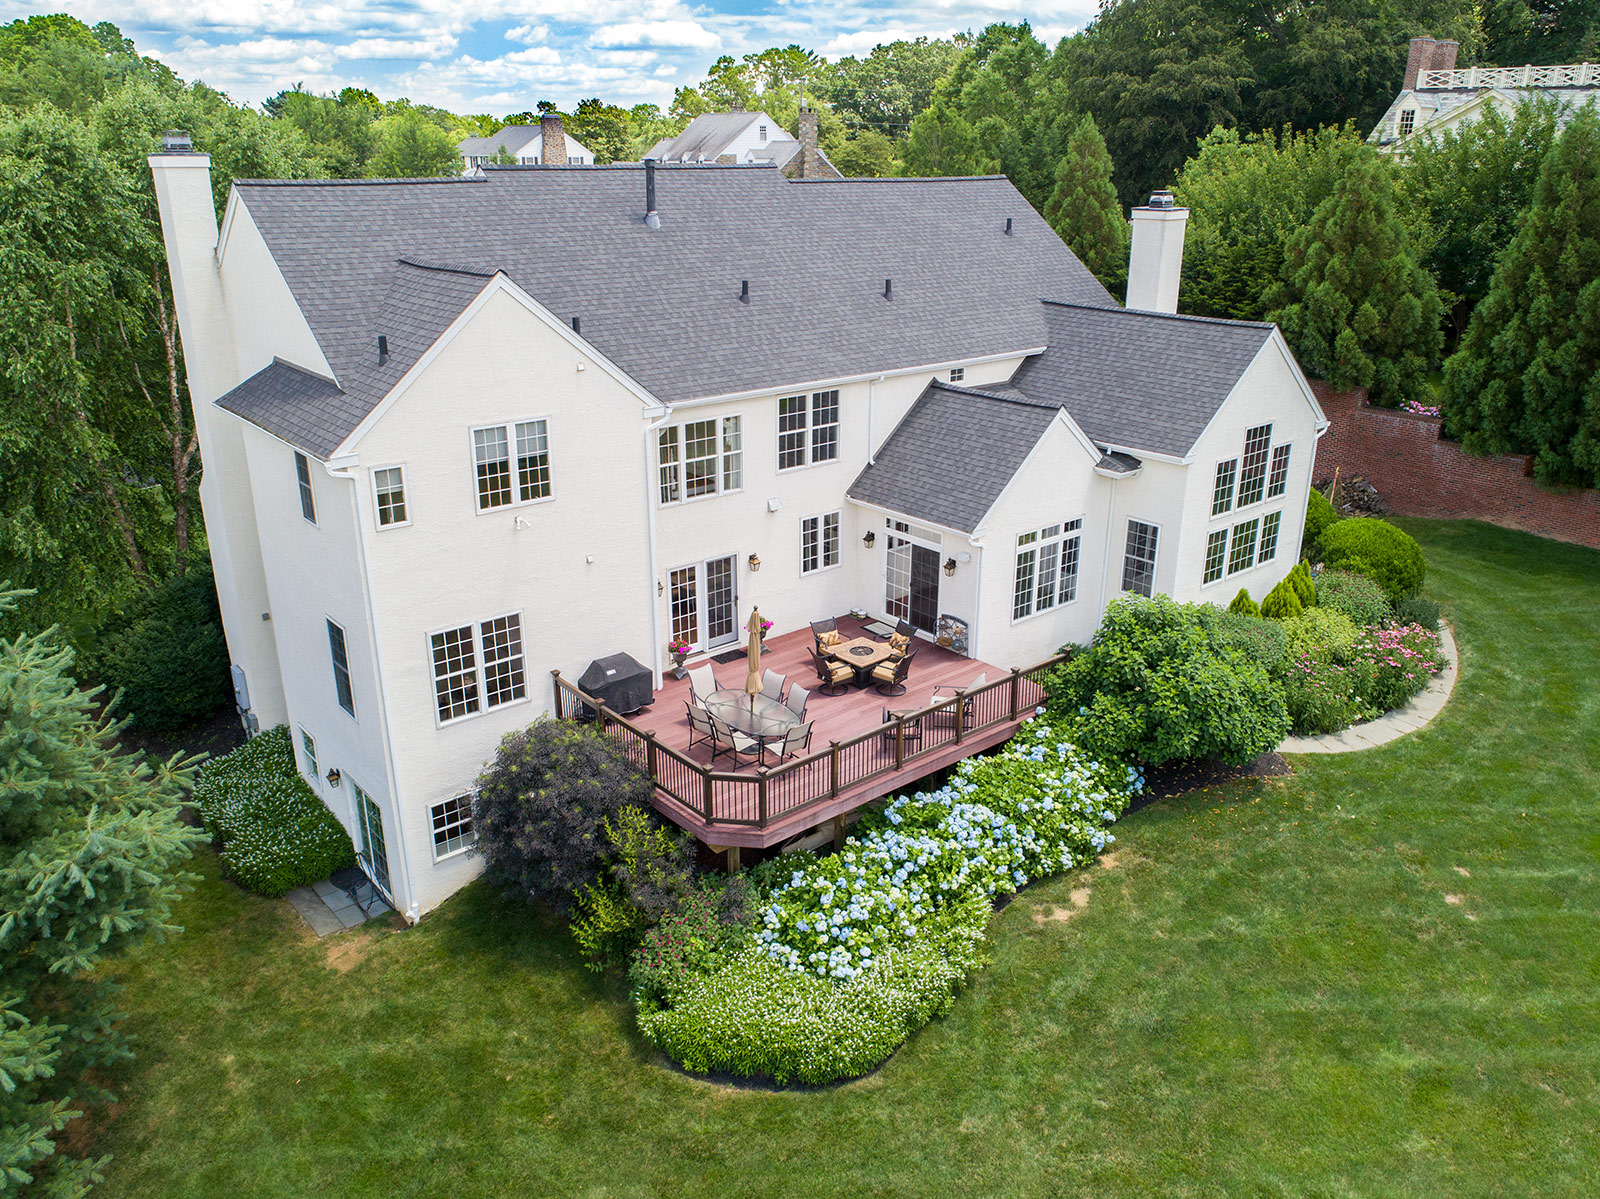
For us, we have one primary use for HDR. Fixing the sun! We constantly find ourselves shooting directly into the sun. Sure, you can use different drone tools to plan the best time of day and avoid the issue. However, you don't always have the luxury of choosing the time of the shoot. As your business grows this scheduling will only become more challenging. This is where HDR can add huge value to your tool set. Done well you can quickly fix an image that seems to have been destroyed by the sun.
Setup your Drone
You are going to want to shoot in RAW which will give you a .DNG image file. In order to rapidly capture the images for HDR you will also need to setup 'bracketed' shots. We typically use 5 exposures instead of 3. Make sure to check your image settings each time you power on the drone and especially after an update. Below is how you configure the DJI Go app for HDR. There are other drone manufacturers that have this functionality as well.
Step 1
Go into your image settings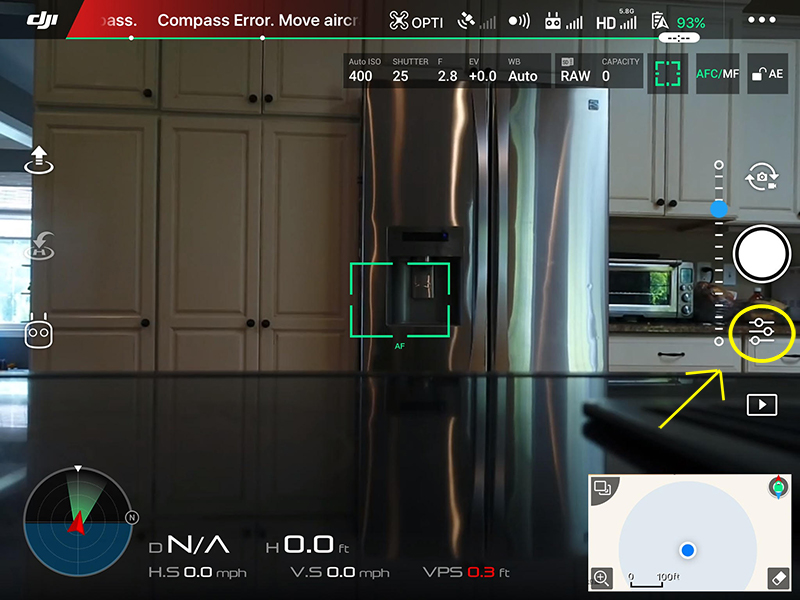
Step 2
Select RAW and configure "Photo"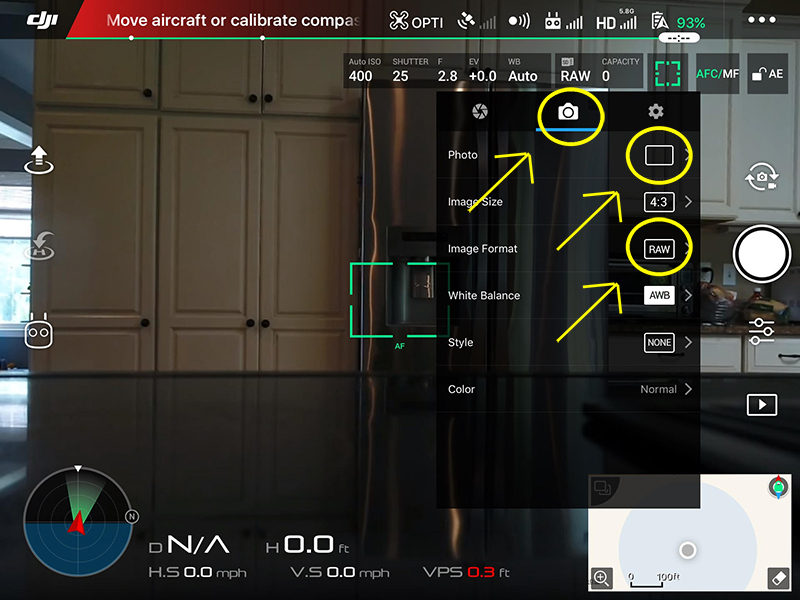
Step 3
Under Photos -> AEB, we use 5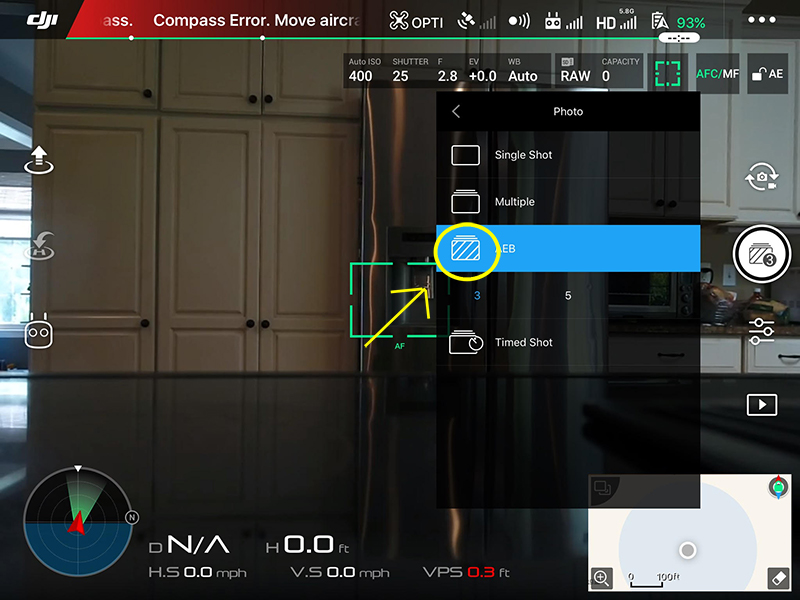
That's it. Your photo button should now look different in the app. If you take a photo and the sound is on you should hear it snap multiple images very rapidly.
Processing the photos
There are many different workflows and software packages you can use to implement HDR post production.
The Google Nik collection and Photomatrix are two popular packages for HDR.
However, we use a combo of Adobe Photoshop & Lightroom.
There is no perfect method, experiment and find one that works for you.
There is a wildly popular Lightroom addon called Enfuse that many use.
We gave it a try but didn't find a way to export in raw (which we like).
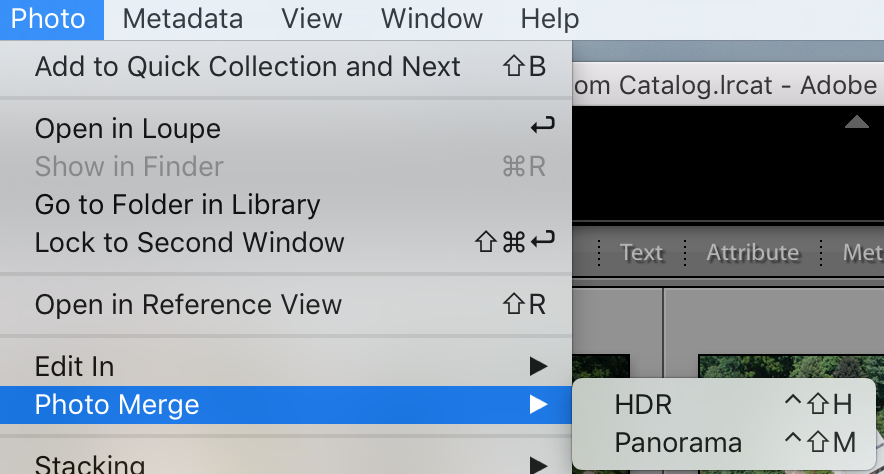
Here is our workflow from a Mac with Lightroom
- Import all photos into Lightroom
- Select the 5 exposures for a photo and merge them
- With one set of photos highlighted(3 or 5) select Photomerge from the menu
- You will be prompted to edit some settings, the default values generally work fine unless there was some movement between when the images were taken. some cameras need these tweaks more than others. The Phantom 4 Pro we use for most shoots rarely if ever needs it. go with the defaults for now and adjust as necessary
- Here's a tip: On a mac after selecting your photos to merge you can hit control+shift+H to skip that menu and start the merge immediately
- You can queue up multiple merges at a time.
After you've merged your photos you now have to either continue to edit them in Lightroom or export them for editing in another program. Most of the time we just dump them into the folder where the rest of our content for the job lives. If doing this make sure to export them in RAW. We then will open them in Photoshop and make any adjustments necessary.
Editing in Photoshop
When you open the images in Photoshop,
Adobe Camera Raw should open them to allow you to do editing before they are available to the normal Photoshop functions.
There will be sliders on the right for adjusting settings of the entire image.
Before you start altering your image click "Auto" that is above the exposure slider.
Photoshop does a great job of giving you a solid baseline image to start with.
Above your image there is a toolbar that allows you to focus on specific areas of the photo.

Start out experimenting with the gradient and oval tools as they tend to be the easiest to get the hang of. Use the gradient tool to select an area of the image then adjust the sliders at the right. You are going to have to experiment to get the hang of it. Certain adjustments have greater effect than others. We find ourselves entirely removing Highlights on many photos. Make sure to adjust "dehaze" and the color sliders to get a feel for what they can do. After you are happy with your results you can "Open Image" and edit it in Photoshop as you normally would. That's it! There is much more to HDR, however this should get you up and running.
This article is part of a series of tutorials we are developing to help drone pilots servicing the real estate industry. If you like what you've read consider joining our Drone Pilot Network